The Liebster Award…….

liebster_award

Hello my sweet, sweet friends! Today, I want to just take the time to thank you guys for reading and subscribing my blog.

I’m able to publish content that you guys enjoy and I’ll try my best to be keep at it! I have the honor to have been awarded with my first Liebster Award. When I started this blog I had no idea where it was going to go, but this is pretty cool that I would even get nominated for an award. A Big Thanks goes out to casuallyalluring for nominating me for a Liebster Award!!! Go check her blog right now. Subscribe to her, you won’t regret it.

So here are The Rules……..

The Rules:

  • Once nominated, make a post thanking and linking the person who nominated you.
  • Include the LIEBSTER AWARD sticker in your post too.
  • Nominate 10 other bloggers who you think are worthy of this award. Let them know that they have been nominated by commenting on 1 of their posts. You can nominate the person who nominated you.
  • Answer the 10 questions asked to you by the person who nominated you and make ten questions of your own for your nominees.
  • Lastly, copy these rules in the post.

Mahagony’s Questions:

What made you decide to blog?

I’ve been following blogs for years and I was so keen to have one of my own blog where I can write about my passion about beauty and fashion. So, I decided to create a blog for that and just write about things that interest me.

What is your favorite makeup product?

Hmmm…. I would say I can’t live without Maybelline Colossal Kajal Or Kohl. I can’t think of leaving home without it..!!!

How much time do you spend on social media?

A pretty good time, I must say half of the time I am on social media for blogging great ideas.

What’s your favorite holiday?

I must say New Year is my favourite holiday. As I love winters and lights both… 🙂

Favorite breakfast food to eat?

Fruits and Oats! I can’t live without them….

Who is your fashion icon?

Kangana Ranaut  and Sonam Kapoor.

Who is your favorite beauty vlogger?

I would say lasheslifelipstick . I just love her makeup skills…:)

Name three things you really like to do.

Travelling, Shopping and Blogging!!

Describe yourself in one word.

Shopaholic…… 🙂

If you had a lot of money, where would you go on vacation?

New York City…:)

I Nominate….

  1. Priya Dhanecha
  2. Elisabeth
  3. Ashley
  4. Zoe
  5. sprinkleofsurprise
  6. M
  7. Kristyn
  8. Sophie
  9. Victoria
  10. Tazzie

My Questions:

  1. What does blogging mean to you?
  2. One skill you’ll love to acquire and why.
  3. A thing that has happened in your life which was like a dream come true for you…
  4. One weird thing you believed in as a child.
  5. What is your dream career?
  6. Favorite season?
  7. Lip gloss or Lipstick?
  8. If you were going to live on a stranded island, what is the one beauty product you would take with you?
  9. What is your favorite thing about yourself?
  10. Who in your life do you look up to the most?

Thanks for reading everyone!! 🙂 And Thanks again Mahagony for the nomination!!!!!!!!!!

xoxo 🙂

Get 3 Finishes with 1 Lipstick………

Hello Style Bunnies 🙂
Lipstick is one product that is close to every girl’s heart and lips. We love our lipsticks and we often end up spending a bomb on them. But do you know that you can actually get your money’s worth by using your lipstick in different ways?

With these simple steps, get different finishes with one lipstick and get stunning looks each time you step out. Have a look:

Light Tinted Shade

Dab some lipstick on your lips with your finger and swipe it gently. Start slowly and add more color as required. You can walk around like this for a natural everyday look or apply a translucent lip balm on your lips to add some glow.

Ideal usage: For an everyday look

Shiny Gloss Look

Begin with applying a full coat of your favorite lipstick shade on your lips. Next, apply a transparent or shimmery gloss over the lipstick. It’s recommended that the gloss is applied just in the center of both the top and bottom lips to get the perfect glossy pout.

Ideal usage: For a party night

Matte Finish

To get the trendy matte look, apply a coat of the lipstick that is already there in your drawer. To get fine precision and give a proper shape to your lips, you can also apply using a lip brush. Next, use a blotting paper to get rid of that extra shine.  Re-apply the lipstick and blot it again. To get that final look, dust some loose translucent powder and get that perfect matte finish.

Ideal usage: For brunch or outings

Now that you know how to get these different looks for various occasions, are you ready to try them on?

Do give your feedback in the comments section below and share your thoughts with us.

GO PINK THIS SUNDAY BRUNCH………… <3


Hello Style Bunnies 🙂
They say, ‘Pink isn’t just a color, it’s an attitude’ and pink is my favourite colour and I think its a favourite colour for every Girl! Here are a few tips to give you a glam but chic look this Sunday brunch:

1. Dress is short or long
A maxi or mini, both work, but make sure to go light because chic pink is the way to go for a brunch.
2. Flutter those lashes
A subtle but yet stand out pink looks great for a day look.

3. For lips that stun
Go all out on your lips with any shade you love! A little contrast is always necessary and a long lasting lipstick is a must for brunch dates.
4. A cheeky blush
The final touch is a little tint of pink on your cheeks to pull it all together.
Hope you like the post and if it so then please like my page and follow me here on WordPress.

Happy Blogging!!!!!!!!!!!

Makeup Trends For FALL 2015…………

Hello style Bunnies 🙂

Fashion week isn’t all about clothes and shoes, it also sets in the makeup trends for the season. Though most of these looks are created best to go with their clothing-line up, there are various looks we could even be inspired from and use in our day to day makeup routine!

So go ahead and never be shy to experiment with these looks to create your own fall 2015 trend.

Flushed by Blush:

Enough with the contouring and sculpting, it’s time for a more natural flushed look. Rosy and peachy cheeks are back this season. It’s simpler and definitely more fun. So get those cheeks blushing with Cheeky Glow.

j lo oscras 2015

                         ROSY-CHEEKS

fine lines

Graphic Liner:

This liner is passe! It’s time for something more dramatic. Get those graphic eyes and show off your liner skills. You can try Colossal Liner to achieve these looks with its flexi tip applicator for ease of use.

6b1add0721cc05d7aa04a3c941f808ef 106ed442c81b859dd28a9006271f45bf 3111-a-graphic-eyeliner-look-1000x0-1

Flaming Red Lips:

There’s nothing revolutionary about red lipsticks, they’ve been around for ages and will be here forever! So find your lifelong red shade that will always be by your side through thick and thin.

31537bbff1b86c304717422d134ee62c 201201201641154554 taylor-swift-hot-taylor-swift-18776371-1163-1492

Bold Berry Lips:

While red is a constant, an addition to the lust-worthy colors would be the different shades of Berry. From purples to mauves to lilac, everything between pink and purple is a must try this season!

bold-lips-11

                                 raspberry-lips

                                          Screen-Shot-2015-02-09-at-11.20.05-AM

Bare Face Look:

No better look than a no-makeup look! That seems to be the mantra for 2015. Models were seen sporting a very minimalistic and natural look. This is definitely something we need to try, considering our harsh weather conditions where your makeup tends to run. So dare to dream with The Nudes palette.

12-fall-winter-makeup-trends-of-2014-L-BAkLBv

MTIxNDI3Mjk1ODE4MzE5Mzcz

Nude-Make-up-trend-runway-model

Sculpted Brows:

Dolce and Gabanna took sculpted brows to a new level at their show this fall. Soft and gentle but highly sculpted brows are in this season. These brows will give your face a much sharper look.

0d49b5c03cb99ce8ec1c066a93cb43af

Brow-Drama-model

Smashbox-Fall-2015-Shapematters-palette

Sparkly Accents:

From crystal studded under liner to dazzling nail paint, this season we’ve seen all things shiny and sparkly, so go ahead be fearless and add some sparkle to your outfit! Obviously, this look will be best recreated at a fashion event or a night out when you’ve decided to go all out.

glitter-eyemakeup-couture

DGC_1

Diamonds&Pearls_SilverScreen_BlackIce_(TwistOfFate)1

So are you ready to get with the trends? Tell us your favorite one below!

Hope you like the post and if it so then please like my page and follow me here on WordPress.

Happy Blogging!!!!!!!!!!!

How To Shape Your EYEBROWS: Tips and Tricks

Hello Style Bunnies 🙂

You have ignored them more than once, sometimes knowingly, sometimes unknowingly. But then you realize later that your face does not look flawless only because you did not pay enough attention to them. Yes, we are talking about your EYEBROWS!

18741079db73f634cbe0f0cec3f114dc

Perfectly defined eyebrows frame your eyes and give definition to your face. The right brow opens up the entire eye area and improves the overall symmetry of the face. However, just like haircuts, eyebrow shapes are not one-size-for-all. The perfect brows depend on the dimensions of your face and the right arches can take years off you! Now that we have your attention, let’s get started and learn how to shape your eyebrows.

The face of an individual plays an important role in determining what kind of eyebrows suits the best. To help you find out your golden arches, we have listed down the best kind of brows for a variety of face shapes:

Square Face:

Rounded brows are best suited for a square face as the jaw line accentuates the angularity of the face. However, make sure to not make them too round and create rainbow-shaped brows.

Square

Round Face:

Since a round face lacks a defined facial bone structure, make sure that your eyebrows are very angular so as to give definition to your face. You can try for higher arches and flatter your face.

Round

Long Face:

A typical characteristic of long faces is vertically stretched features. Therefore, in such a case, you should play up on your eyebrows and emphasize on your horizontal features. For this, extend the tails of your eyebrows east-to-west and go beyond the corner of the eye to get the perfect shape.

Long

Heart Shaped Face:

Keep your eyebrows well-manicured and perfectly groomed and you’re good to go. This will compliment your petite jaw line and balance the smaller chin area.

Heart

Oval Face:

For such a well-proportioned face, a classic brow with a slight arch will make the day.

Oval

Now that you know what kind of brow shape you should aim for, let’s get down on how to actually shape them:

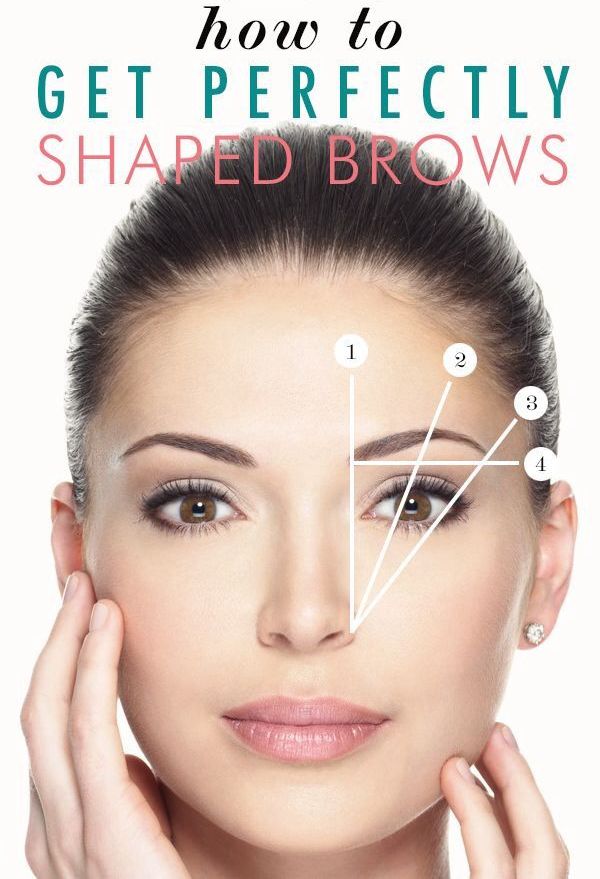
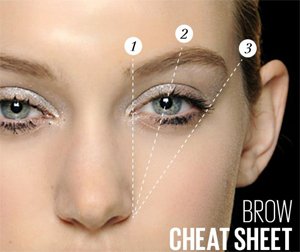
1. Before you actually start playing with your eyebrows, visualize the shape of your brow. The front of the eyebrow should be in sync with the upper bridge of the nose. The arch should be at three-fourth of the brow starting from the nose bridge. The tail should taper down and follow the angle of the eye. You can also use a white marker to mark your eyebrow shape.
Visualize1
2. Now that you know the brow shape, use a spoolie brush or an old mascara wand to lift your hair and coax them in place.
Spoolie-Brush1
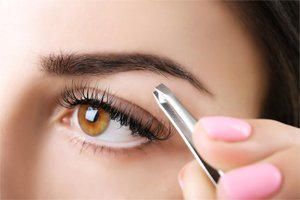
3. Start tweezing out all those stray hair with a slant tipped tweezer. Adjust your hand position and remove the hair in the direction of its growth. Unless you’re an expert, tweeze only the hair underneath your eyebrow and not above the brow.
Tweezer
4. Once you’re done tweezing, use an eyebrow pencil and fill in your brows with thick, short strokes along your brow bone. Go lighter in the start and darker in the end.
Pencil-150x150
5. Now spread the color evenly to get well-groomed eyebrows.
Powder-Brush-150x150
6. After you’re done, dust a little translucent powder on your eyebrows to set your brow pencil and make them look freshly groomed.
Last
Remember, the perfect eyebrows will make you look fresh, young and attractive. So are you ready to #DuoItYourself and wow those brows? Share your looks with us and give your feedback in the comments section below.
Hope you like the post and if it so then please like my page and follow me here on WordPress.

Happy Blogging!!!!!!!!!!!

Why And How To Clean Makeup Brushes………?

Hello Style Bunnies 🙂

I’m back with another post for the day. We all use make-up brushes day in and day out to ease make-up application, and also to get the right kinds of finishes of the products. But most of us ignore cleaning these make-up brushes! With time, these brushes get worn out, which may be harmful for our skin. Using the same brush over and over again can be very un-hygienic. Since brushes are used for dry, wet and creamy products, bacteria tend to accumulate and grow on the surface of the brushes, and you may end up with break-outs on the face out of sheer carelessness and laziness.

The life of brushes also depends on various factors like where and how you store your them.

how-to-clean-makeup-brushes

Why To Clean Makeup Brushes:

If you are a regular wearer of make-up, it is recommended to wash the brushes at least once week, or every alternate weeks. Here are some more facts about what dirty brushes can do to your skin.

1. Dirty Brushes are a Hub of Germs: When brushes are not cleaned regularly, dust, dirt and germs collect on them, which when used, get transferred to your other make-up products. As we all know, germs spread more rapidly in moisture, contaminating other things. Hence, do not keep liquid make-up nearby dirty brushes or do not use these brushes with liquid make-up.

2. Dirty Brushes Compromises on your Makeup Art: Dirty brushes do not blend well with eye shadows and blushes, hence not truly bringing out the colour you meant to wear. No matter how much you have invested into buying that eye shadows or blushes, not maintaining the brushes could result in short durability and non-functionality.

3. Dirty Brushes can result in Skin Problems: It is always advisable to use clean or dirt free products on your skin & when it is about make-up, hygiene becomes more important. Careless attitude towards make-up product may result in skin problems. After using make up brushes, simple put it into a proper wash before you decide to reuse it.

4. Making it a Good Investment: Regular cleaning of the brushes increase their life span and make them act smoothly on your skin.

5. Sharing Brushes Make them More Dirty: Sharing brushes make them more vulnerable to germs. Since, you will be transferring germs to the other person and vice versa. You certainly do not want to carry the other person’s filth on your face. Simply, clean the shared brushes!

By now, you would have been convinced that why you should be regularly cleaning your make-up brushes. The important question is how! How to clean makeup brushes at home?

How to Clean Makeup Brushes:

Clean-with-Sponge-Baby-Shampoo

1. Use Olive Oil

Olive oil acts as a gentle cleanser and helps in keeping the bristles conditioned. Brushes made from natural hair or fibers should be cleaned using olive oil. Pour a tablespoon of olive oil onto a clean sponge (preferably a new one). Now swirl the brush over the sponge until dirt residues are transferred to the sponge. If your brush is still left unclean, you must repeat the process. Now rinse the brush under warm water to remove excess oil. Let the brush dry by placing it on a clean towel for some hours.

2. Use a Soap Bar

Choose a plain (unscented) bar of soap and wet it. Place it inside a bowl, so that it won’t slip away. Now swirl the brush in a circular motion onto the soap to form a lather. Ensure that soap does not enter the barrel as this will damage the glue that sticks the bristles to the handle. Also, do not press the brush hard. After cleansing is done, run some warm water on the brush to clean up the soap lather. Place brushes on a clean towel to let them dry. Soap bar is usually used when the brushes’ bristles are made of plastic.

3. Clean with Sponge and Baby Shampoo

Wet a clean sponge and put a little baby shampoo on it. Now swirl the tip of your brush in a circular motion on the sponge. This will work up the lather and help the soap clean your brush. Now, wash the bristles under warm water and allow it to dry on a clean towel.

Tip: Leave the brushes to dry over-night. Avoid using a hair dryer to dry the brushes, as the heat may damage the bristles in the long run.

makeup-brushes

Hope you like the post and if it so then please like my page and follow me here on WordPress.

Happy Blogging!!!!!!!!!!!

1000+ HITS…. THANK YOU!!!!!!!!!!!!!

              1000                                                                  

Hello Everyone,

Well as of today I have received over 1000 Hits on my blog so I wanted to say a huge thank you to everyone that has taken a look.  Honestly when I started this two months ago, I had no idea it was going to turn out into this. I thought it was going to be a little blog where I post a few entries a week. But over time, my passion and ideas behind this little site became bigger.

It’s been overwhelming how positive and friendly the WordPress community is. I’ve grown to love being a part of it and I always look forward to what everyone else has to offer.

I would love to blog about the things that everyone wants to see, so your feedback is greatly appreciated. If you want to see any specific kind of blogs, then I am here for you. Leave me a comment and let me know. Please don’t forget to like my posts and subscribe to my blog for quick updates on carryurswag.wordpress.com

I seriously can not thank you enough. Reading My blogs and giving your time is the nicest thing you can do for me.

 So Thank you, thank you, thank you everyone I really can’t explain how happy this makes me.

Love and Hugs to You all!!!!!!!

thank-you-clothesline-752x483

Basic Makeup Application Techniques………..

Hello Style Bunnies 🙂

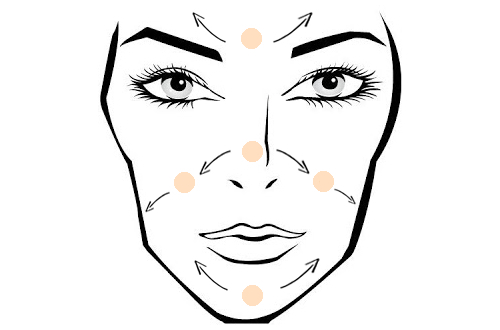
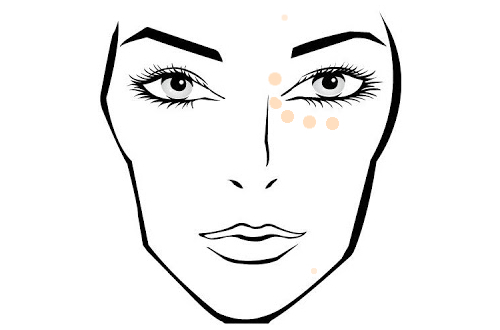
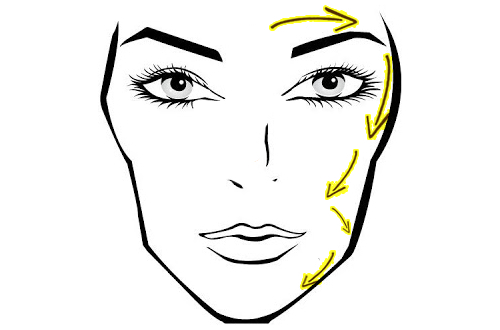
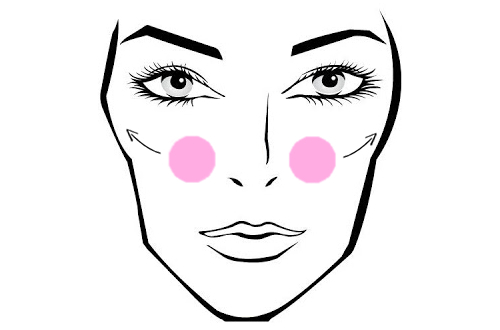
Super confused on where and when to apply concealer? Or don’t even have the slightest clue on where you should apply your illuminator? These basic, quick and easy to follow images & information will have you looking great in a flash and flatter everyone!

makeup-artistry-cairns-makeup-course-101-basic-application

Primer and Foundation:

Primer should be applied after moisturising/before foundation. For best results use (clean) fingers, press into the skin. Use the same technique for foundation but allow at least a minute for your primer to absorb. A foundation brush, fingers or buffing brush will produce the best results but the key is to blend. Powder foundation should be applied using a powder buff and any excess should be dusted away with a kabuki brush. Mineral foundations need to be buffed into the skin or you’ll get a cakey finish.

tumblr_inline_msh2r3i2FY1qdfkq5

Concealer:

With the exception of colour correcting concealers, concealer should always be applied AFTER foundation, not before otherwise it will just rub off, besides your foundation covers most minor imperfections anyway! Apply a creamy concealer to the undereye area or a waxy concealer to any pimples/scars using a brush. Once applied pat the concealer into the skin using your ring finger for a natural looking finish, the warmth of your fingers will help for easier blending.

tumblr_inline_msh30qb7TC1qdfkq5

Bronzer:

Bronzer should be applied with a small fluffy brush or an angled powder/contouring brush. Apply it in a three motion around the hairline, under the cheekbones, around the jawline and under the chin for a healthy glow. If you have dark skin, just stick to a highlighter.

tumblr_inline_msh367jRkg1qdfkq5

Contour:

Contouring is the perfect way to make your face appear structured and slim provided you do it right! Use a powder or foundation two shades darker than your skin-tone and apply it down the sides of the nose, under the cheekbones, around the hairline, jawline and chin using an angled powder brush (or your fingers for cream products)

tumblr_inline_mskwtrGS2q1qdfkq5

Blush:

After applying bronzer & contour using a blush brush (a huge powder brush doesn’t count!) or your fingers (if using cream blush) relax your face, applying blush to the apples of your cheeks and blend upwards. Contrary to popular belief blush shouldn’t be applied while smiling, it will actually drag your features down!

tumblr_inline_msh374qWJw1qdfkq5

Highlighter/illuminator:

Apply to the highest points of your face. Bridge of the bridge of your nose, cheekbones, cupids bow and if you have dry skin the center of your forehead and chin. Use illuminator sparingly and opt for cream formulas.

tumblr_inline_msh37j994O1qdfkq5

Hope you like the post and if it so then please like my page and follow me here on WordPress.

Happy Blogging!!!!!!!!!!!

Upper Lip Hair Removal – 5 Home Remedies……………

Hello Style Bunnies 🙂

How many of you are facing upper lip hair problem? You might have already tried out all available solutions like tweezing, waxing, bleaching, using hair removal creams etc. but the hair grows back after some time and you again start to feel horrible, right? Well, chemicals, synthetic beauty products or artificial processes can only show a temporary effectiveness when it comes to upper hair removal.

Best-Natural-Ways-for-Upper-Hair-Removal

If you want to get rid of this awkward problem completely, Opt for any of these following natural and skin-friendly home remedies:

1. Turmeric Paste: Turmeric itself is a wonder remedy for upper lip hair. Pour a fair amount of turmeric powder into a small bowl and add some cold water to it. Create a paste of thick consistency as well as smooth texture.

Turmeric-paste

Then, apply it to the upper lip section. It usually needs 25-30 minutes to get dried. After that, rub with a wet cotton ball or simply wash it off. Regular application of this paste is very helpful in removing upper lip hair and reducing its growth.

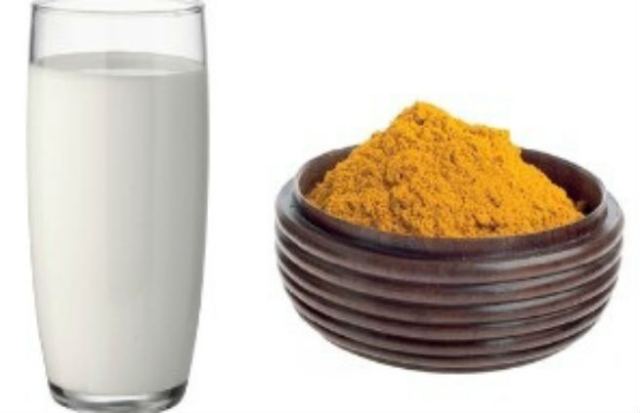
2. Turmeric and Milk Paste: Take a small mixing bowl and put a small amount of turmeric powder in it. Pour a little milk into it and prepare a fine paste. Now, apply this paste to the affected area of hair growth and let it dry. Rub the area gently and remove the dried paste completely.

upper-lip-hair-removal-3

If you use this home remedy continuously for one month, the growth of your upper lip hair will become significantly slow.

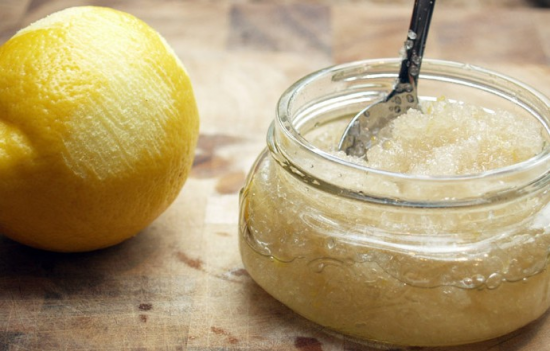
3. Lemon and Sugar Mix: Lemon is an effective natural bleach and sugar is a gentle natural scrub. When both of these are combined, we get a very good remedy for our upper lip hair. Start with squeezing out the juice of the lemon in a small glass bowl. Add a teaspoon of sugar to it. Also, pour a little water to dilute the mixture to some extent.

51a9f62614a55ac86f83d57f7c575a4f

Now, blend all the ingredients properly with the help of a spoon. Use this concoction on the area of hair growth and wash it off after 15 minutes with fresh cold water.

4. Egg White, Corn Flour and Sugar Peel: You can also prepare a natural peel for your upper lip hair removal. All you need is the white section of an egg, one teaspoon of corn flour and a little sugar.  Mix all these kitchen ingredients in a mixing bowl in such a way that it turns into a sticky paste.

Egg-White-Corn-Flour-and-Sugar-Peel-252x300

Apply the paste on the unwanted hair in your upper lip region and allow it to dry completely. Finally, peel the dried layer off. Do this every alternate day to experience a visible difference.

5. Gram Flour, Turmeric and Milk Paste: Gram flour (the flour made from split chickpeas) can also be used as an effective component in your homemade upper lip hair removal remedy. Take a tablespoon of gram flour and put a dash of turmeric powder in it. Also, add a very little amount of fresh milk and combine everything to a smooth and thick paste.

MilkTurmeric-and-Gram-Flour

Now, apply it on your upper lip hair and leave for some time. As soon as the paste dries, scrub in the opposite direction of the growth of the hair and remove it. You can also replace the milk with a teaspoon of fresh cream. It will also give you the same result.

So, now that you know these home remedies for upper lip hair removal, you can say good bye to your unwanted hairs on upper lip.

Hope you like the post and if it so then please like my page and follow me here on WordPress.

Happy Blogging!!!!!!!!!!!

10 Awesome Lipstick Hacks You Have Never Heard Before!!!!!

Hello Style Bunnies 🙂

Today I am sharing ways to make the most out of your amazing lip shades. Let’s roll then!

Make Your Lip Colour Last Longer : A major concern for most of you, am I right? Well, fix it in micro-seconds. Just try blotting your lips after first application so that extra oil gets removed. This way, the second coat grips better and doesn’t fade off your lips as quickly.

wpid-screenshot_2015-08-30-19-47-05-11


Looking For That ‘Perfect’ Red For Your Skin Tone ? Red is hot! Like seriously. I absolutely love it and that’s why, have this mantra for all tones. If you’re fair, opt for a blue-based red; if you’re medium toned, go for an orange-y red and if you’re towards the darker tone, try grabbing one burgundy red. Take a note ladies, this would definitely work for that killer pout!

redlipstick


Perfect Your Cupid’s Bow : Yes. This matters. And how! Just draw a small “X” with a lip pencil on the center of your upper lip. Then, fully line your lips and fill in the rest of your lips with matching lipstick. There you are, ready with a kiss of love!

13


That Amazing Nude Shade : Shun your doubts (if any) about trying the basic minimal look. When choosing a nude lip colour, go for one that is one shade darker than your skin tone. If you’re fair-skinned, try a nude with a hint of pink in it, for wheatish complexion, go with a nude that has orange undertones and divas with dusky skin tone, can opt for chocolate or rosy brown with a hint of shimmer, or caramel brown that can counteract redness.

UDLSpt1-2


Turn Any Lipstick Into Long-Wearing Version : This is quick and cool. Just get your hands on a translucent powder. Now, apply your lip colour, then hold a tissue over your mouth and dust translucent powder over it. A small amount of the powder through tissue will help locking the lip colour…there and then. All intact for long!

DSC_0260


Repurpose Broken Eye Shadow as a Lip Colour : If your favorite shadow crumbles and it’s a color you won’t mind wearing on your lips, then your are super lucky! Just store the broken pieces and mix them with some lip balm/ petroleum jelly on a spoon. Once through, you can apply the mix with the help of a lip brush. Easy, isn’t it?

1d495ec5916e46baa17240f9c63df9bafbfe97f3


Use Your Favourite Pink Lipstick as a Blush : Choose your favourite shade of pink and apply gently on cheeks. Just make sure you blend it in upward strokes with your finger like you would do with any cream blush. That is it. Rock in pink!

Tips-on-how-to-wear-lipstick-as-blusher


Exfoliate Dry Lips For a Smoother Lipstick Application : Nothing looks good on chapped, dry or darker lips. Use a baby toothbrush or a clean, disposable mascara wand and just apply a balm over your lips. Now try soft strokes to remove any flaky skin.

beauty-hacks-lip-exfoliation-lipstick


Make Your Lips Appear Larger : You can apply one shade of lipstick over your entire mouth and then a shade lighter from the same colour family in the center portion of your lips. This would make them appear fuller. Do try!

BritCo_FullerLips09-645x429


Store Your Lipstick In a Cooler Place : When it’s warm, choose to keep your lipsticks in the fridge to keep them from melting and make them last longer.

lipstick-in-fridge


That was my quick view on keeping your treasure safe. Hope you enjoyed reading it. Look forward to a perky feedback from you, girls!

Drop in some comments and yeah…dare you forget to pout!


Hope you like the post and if it so then please like my page and follow me here on WordPress.

Happy Blogging!!!!!!!!!!!